
前言
在三周年之前给小范围翻新了博客,首先在footer版权注释、首页页码和changelog窗口标题继续改为了像素字体,其次调整了博客主题配色和Waline评论区配色,最后换上了全新订制的像素小狗(或者说,垂耳兔(?)的logo图标和母肥像素小人(弦月睡袍ver.)的鼠标指针,现在的天堂错误文件已经是粉蓝色的天下了!
添加返回顶部按钮演出特效
米米给我约了一张超级无敌可爱的猫头小鹰变身母肥的像素小动图!本来最初是打算做成头像,但转念一想这个风格似乎更适合博客,遂打开主页研究母肥安置地点,其中一张放在了侧栏的contact的小弹窗,另一张透明底的gif则被我摆在了博客右下角返回顶部的按钮,只需要点一下就能看到一只母肥出现!
那么如何在顶部按钮上获得一只这样的母肥呢,首先我们需要在按钮的HTML的代码里增加一个隐藏的GIF容器,fuji主题里返回顶部按钮的前端代码在layouts/patials/components.html里。
    <div class="btn-scroll-top">
        <img src="https://img.naturaleki.one/lock/candy1.gif" class="scroll-top-gif" style="display: none;" />
        <i class="iconfont icon-chevron-up-circle-sharp"></i>
    </div>
然后在/assets/js/fuji.js里修改原来返回顶部按钮的js功能,修改后的js如下:
  // 获取按钮和 GIF 动画元素
  const scrollTopButton = document.querySelector('.btn .btn-scroll-top');
  const gifElement = document.querySelector('.btn-scroll-top .scroll-top-gif');

  // 确保按钮存在
  if (scrollTopButton) {
    scrollTopButton.addEventListener('click', function () {
      // 滚动到页面顶部
      document.documentElement.scrollTop = 0;
      document.body.scrollTop = 0; // 为兼容 Safari

      // 如果存在 GIF 动画元素
      if (gifElement) {
        gifElement.style.display = 'block';

        // 重新加载 GIF 以播放动画
        const originalSrc = gifElement.src;
        gifElement.src = '';         // 清空 src
        gifElement.src = originalSrc; // 重设 src 触发重播

        // 动画结束后隐藏
        setTimeout(function () {
          gifElement.style.display = 'none';
        }, 1950); // 根据 GIF 长度调整时间
      }
    });
  }
pjax下的封装js代码
// to-top button
// 封装滚动到顶部按钮的功能 + 播放顶部 GIF 动画
function initScrollTopButton() {
  const scrollTopButton = document.querySelector('.btn .btn-scroll-top');
  const gifElement = document.querySelector('.btn-scroll-top .scroll-top-gif');

  if (!scrollTopButton) return;

  scrollTopButton.addEventListener('click', () => {
    // 返回顶部
    document.documentElement.scrollTop = 0;

    // 如果有 GIF 动画元素
    if (gifElement) {
      gifElement.style.display = 'block';

      // 重新触发 GIF 播放(reload src)
      const originalSrc = gifElement.src;
      gifElement.src = '';
      gifElement.src = originalSrc;

      // 设定延时隐藏 GIF
      setTimeout(() => {
        gifElement.style.display = 'none';
      }, 1950); //
    }
  });
}

// 初次加载时调用
initScrollTopButton();

// PJAX 加载完成后重新绑定
document.addEventListener('pjax:complete', function () {
  initScrollTopButton();
});
推送一下就没问题啦,此外左下角全局播放器的图片也换上了另一张无比可爱的垂耳狗塑母肥酱,妈妈,米米就是我的妈妈!
文章正文前添加介绍
其实很早就想实装这个功能了,但不知不觉就拖到了三周年前夕……
在/layouts/_default/single.html里找到post-meta和post-content,在它们之间添加:
{{ with .Params.description }}
<p class="post-description">
    †{{ . }}†
</p>
{{ end }}
“†”符号代表了我平庸的博客美化水平。
最后丢入css:
.post-description {
    font-size: 1.03em;
    color: #828486;
    margin-top: 0.5em;
    margin-bottom: 1.5em;
    line-height: 1.6;
    font-family: "ipxs","Product Sans",sans-serif !important;
}
欣赏效果的时候在想要是早点装上这个就好了(?
侧栏添加随机博客文章跳转按钮
我经常心血来潮想回顾一下以前写的博客,但在归档列表里挑着看的话又会犯选择困难症。于是就干脆在侧栏弄了一个随机跳转的random按钮,这样所有的文章就都是我的卡池。
在/static/js目录下新建random.js复制以下代码。
// 收集所有 /post/ 开头的文章链接(排除当前页面)
const currentPath = location.pathname;
const links = Array.from(document.querySelectorAll("a"))
  .map(a => a.href)
  .filter(href => {
    try {
      const url = new URL(href, location.origin);
      return url.pathname.startsWith("/post/") && url.pathname !== currentPath;
    } catch (e) {
      return false;
    }
  });

// 点击按钮随机跳转
document.getElementById("random-post-button")?.addEventListener("click", () => {
  if (!links.length) {
    console.warn("随机文章跳转:链接列表为空");
    return;
  }
  const randomLink = links[Math.floor(Math.random() * links.length)];
  window.location.href = randomLink;
});
然后在/layouts/patials/footer.html中引入js代码。
<script src="/js/random.js"></script>
最后在侧栏layouts/patials/components.html和layouts/patials/sidebar.html里添加新的按钮,关于侧栏按钮样式可以参考■■Loading:《hugo装修日志09》■■。
<li class="desktop-icon">
 <a href="javascript:void(0);" id="random-post-button" data-random-enable="true">
   <img src="https://img.naturaleki.one/lock/random.png">
   <span>Random</span>
 </a>
</li>
本来想加入一个ssr页面作为彩蛋,不过考虑到实用性和图床流量问题后又放弃了,以及测试的时候好几次都随机到了QR社游戏感想的博客,概率学真是迷人的事物啊(?)以及添加了随机功能后侧栏按钮就变成了无法双排的单数,但也没有特别想加的新界面,就这么暂时放置吧。
补充:手机端适配
发现这个功能在移动端模式下无法跳转,和GPT搏斗了半天,最后靠把另一条的js代码放在主题自带的fuji.js下解决了。
//手机端随机

function collectPostLinks() {
  const currentUrl = new URL(location.href);
  const currentPathAndSearch = currentUrl.pathname + currentUrl.search;

  const links = Array.from(document.querySelectorAll("a"))
    .map(a => a.href)
    .filter(href => {
      try {
        const url = new URL(href, location.origin);
        return url.pathname.startsWith("/post/") && (url.pathname + url.search) !== currentPathAndSearch;
      } catch {
        return false;
      }
    });

  window._postLinks = links;
}

// 每次加载都抓取一次链接
collectPostLinks();
document.addEventListener("pjax:complete", collectPostLinks);

// 始终监听点击
document.addEventListener("click", function (event) {
  if (event.target.closest("#random-post-button")) {
    const links = window._postLinks || [];
    if (links.length === 0) {
      alert("没有可用的随机文章链接");
      return;
    }
    const randomIndex = Math.floor(Math.random() * links.length);
    const randomLink = links[randomIndex];

    if (window.pjax && typeof window.pjax.loadUrl === "function") {
      window.pjax.loadUrl(randomLink);
    } else {
      window.location.href = randomLink;
    }
  }
});
pjax下的封装js代码
(function () {
  // 自动抓取所有文章链接(根据具体博客结构调整选择器)
  function collectPostLinks() {
    const currentPath = location.pathname;
    const links = Array.from(document.querySelectorAll("a"))
      .map(a => a.href)
      .filter(href => {
        try {
          const url = new URL(href, location.origin);
          return (
            url.pathname.startsWith("/post/") &&
            url.pathname !== currentPath
          );
        } catch (e) {
          return false;
        }
      });

    window._postLinks = Array.from(new Set(links));
  }

  // 启动按钮监听
  function bindRandomPostButton() {
    const btn = document.getElementById("random-post-button");
    if (!btn) return;

    const enabled = btn.getAttribute("data-random-enable");
    if (enabled !== "true") return;

    btn.addEventListener("click", () => {
      const links = window._postLinks;
      if (!links || links.length === 0) {
        console.warn("随机文章跳转:链接列表为空");
        return;
      }

      const randomIndex = Math.floor(Math.random() * links.length);
      const randomLink = links[randomIndex];

      // PJAX 支持
      if (window.pjax) {
        window.pjax.loadUrl(randomLink);
      } else {
        window.location.href = randomLink;
      }
    });
  }

  // 初始化
  function initRandomPostFeature() {
    collectPostLinks();
    bindRandomPostButton();
  }

  // 初次加载
  document.addEventListener("DOMContentLoaded", initRandomPostFeature);

  // PJAX 支持:重新收集链接 + 绑定按钮
  document.addEventListener("pjax:complete", initRandomPostFeature);
})();
字体加载速度优化
这是为了能在全家网络最差的my卧室里也能快速加载出博客自定义字体而拟定的解决方案:
1.将所有目前使用字体文件从.ttf格式替换为.woff2,.woff2是专为Web端渲染优化的字体格式,体积通常比.ttf小70%(中文英文日文大全套字体除外)。官方字体发布页面有woff2格式文件就直接下载替换,如果没有就借助fontforge工具就手动转换。
2.将字体文件上传到Cloudflare的R2图床,借用CDN加速实现更快的调用,图床搭建可以参考■■Loading:《hugo装修日志06》■■。不过,字体文件从第三方域名加载时,通常会存在CORS(跨域资源共享)限制问题,因此我们需要给存储桶配置CORS策略。
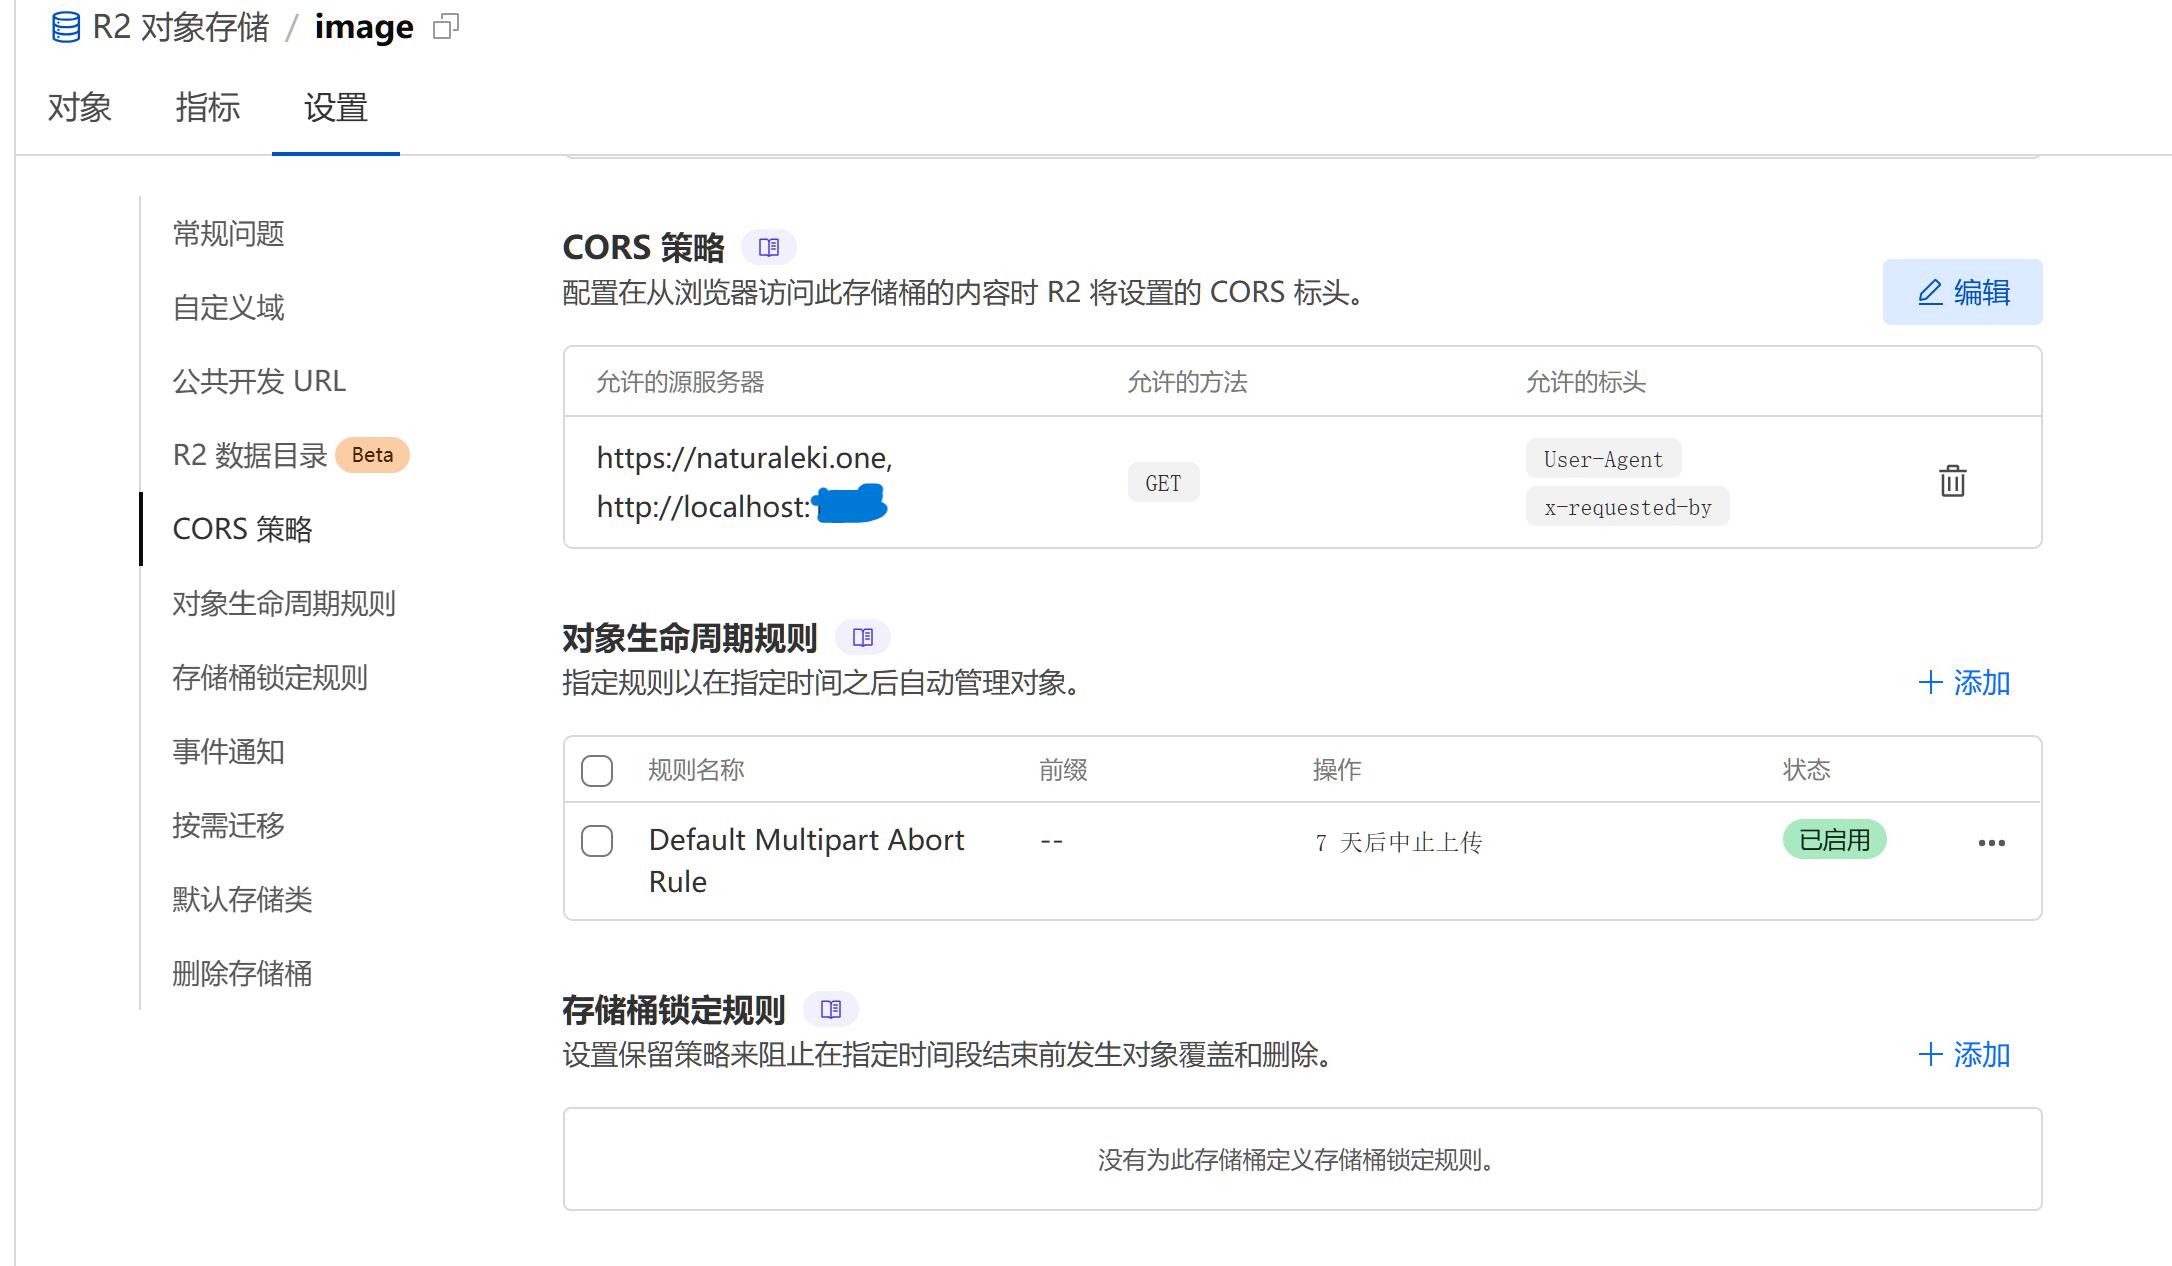
在cf仪表板的相应r2存储桶的设置页面里,找到CORS策略一栏,点击右上角编辑,在右侧弹出的新窗口中黏贴下面的代码,具体也可以查看官方文档:
[
  {
    "AllowedOrigins": [
      "博客url",
      "本地预览url(如需"
    ],
    "AllowedMethods": [
      "GET"
    ],
    "AllowedHeaders": [
      "User-Agent",
      "x-requested-by"
    ],
    "ExposeHeaders": [
      "Content-Encoding",
      "cf-cache-status",
      "Date"
    ],
    "MaxAgeSeconds": 3600
  }
]
保存,等待一分钟延迟后,就可以在自定义css里正常引用字体和修改博客字体了。个人测试了一下,字体加载速度似乎确实有加快,不管是不是错觉,至少博客体量变轻也是一件好事。
正文链接样式修改
又是一个很早就想改的部分,来都来了,干脆直接改了吧,在自定义css里直接copy以下内容:
.post-content.markdown-body a {
  text-decoration: none;
  color: var(--color-secondary);
  border-bottom: 1.5px solid transparent; /* 默认不显示 */
  padding-bottom: 1.5px;
}

.post-content.markdown-body a:hover {
  border-bottom-color: currentColor; /* hover 时显示 */
}