
涂装artitalk页面
已删除
忘记拍……存档纪念照了!
最初是在象友的博客里看到了类似sns那样发布说说的页面,(顺便宣传一下她的超级美丽的小铁块赛博展柜!)。查了一下得知是基于发布说说的JS:Artitalk实现的,遂立刻着手给自己的博客也整一个玩玩。
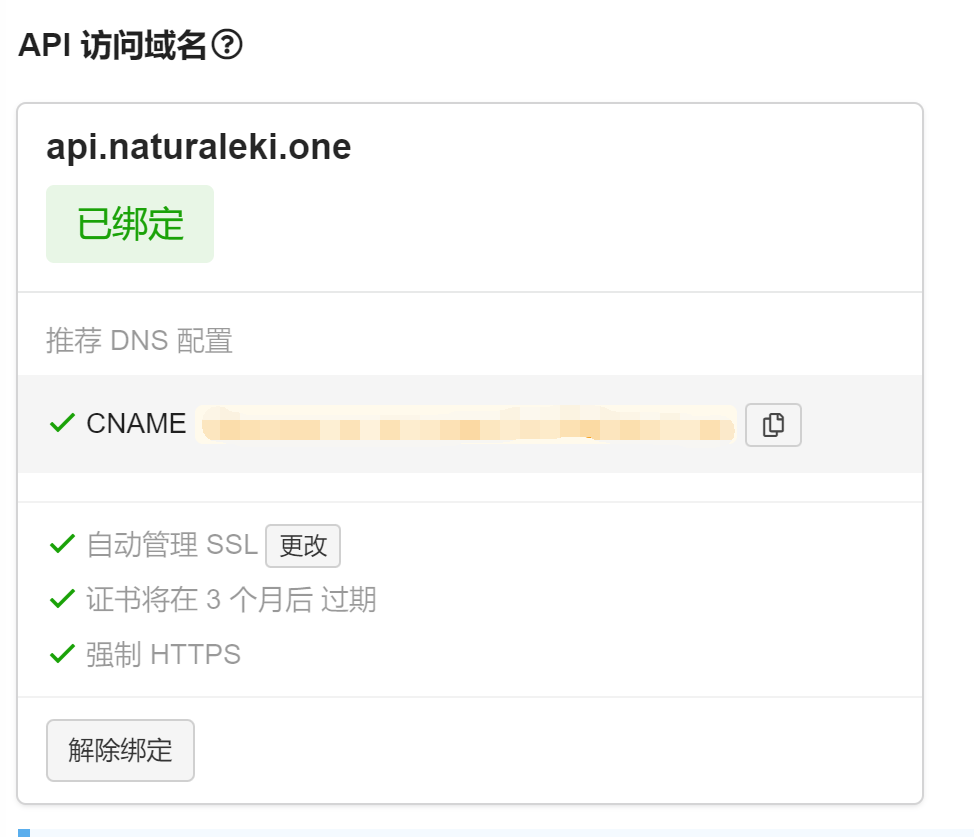
首先参照官方的使用文档,在国际版Leancloud里创建好新的数据库。注意的是如果要实现直连的话需要在leancloud的设置-域名绑定里为api访问绑定自己的域名,我是又让我的主域名有丝分裂了个子域名出来,这个域名绑定没有vercel那么快,设置完CNAME后要等十多分钟才会显示绑定成功。
接着我们需要在博客里安装一个独立页面,首先在layouts\_default中新建一个eki.html,在里面写入文档给的引入代码并修改前端配置,记得在serverURL里写上绑定后的新域名。
{{ define "main" }}

<script type="text/javascript" src="https://unpkg.com/artitalk"></script>
<div id="artitalk_main"></div>
<script>
    new Artitalk({
    serverURL: '',
    appId: "",
    appKey: "",
    pageSize: 100,
    motion: 0,
    color3: "var(--card-text-color-main)",
    color1: "var(--color-codebg)",
    color2: "var(--color-codebg)",
    atComment: 0,
    });
</script>

{{ end }}
之后在\content目录下新建一个eki文件夹,在这个文件夹里新建_index.md,复制以下内容。
---
title: "白纸湾"
layout: "eki"
comments: false
---
页面上会出现的文字。可以留空。
以上所有步骤完成后,修改一下侧栏添加页面跳转链接,一键推送到github,就可以在博客上看到崭新的Artitalk页面了!成品在这里,之前是当歌单用的,但发现网易云外链加载太慢容易卡,又换回了文字。或许未来会变成定期打卡地吧!
存档站,成立!
已删除
存档纪念照
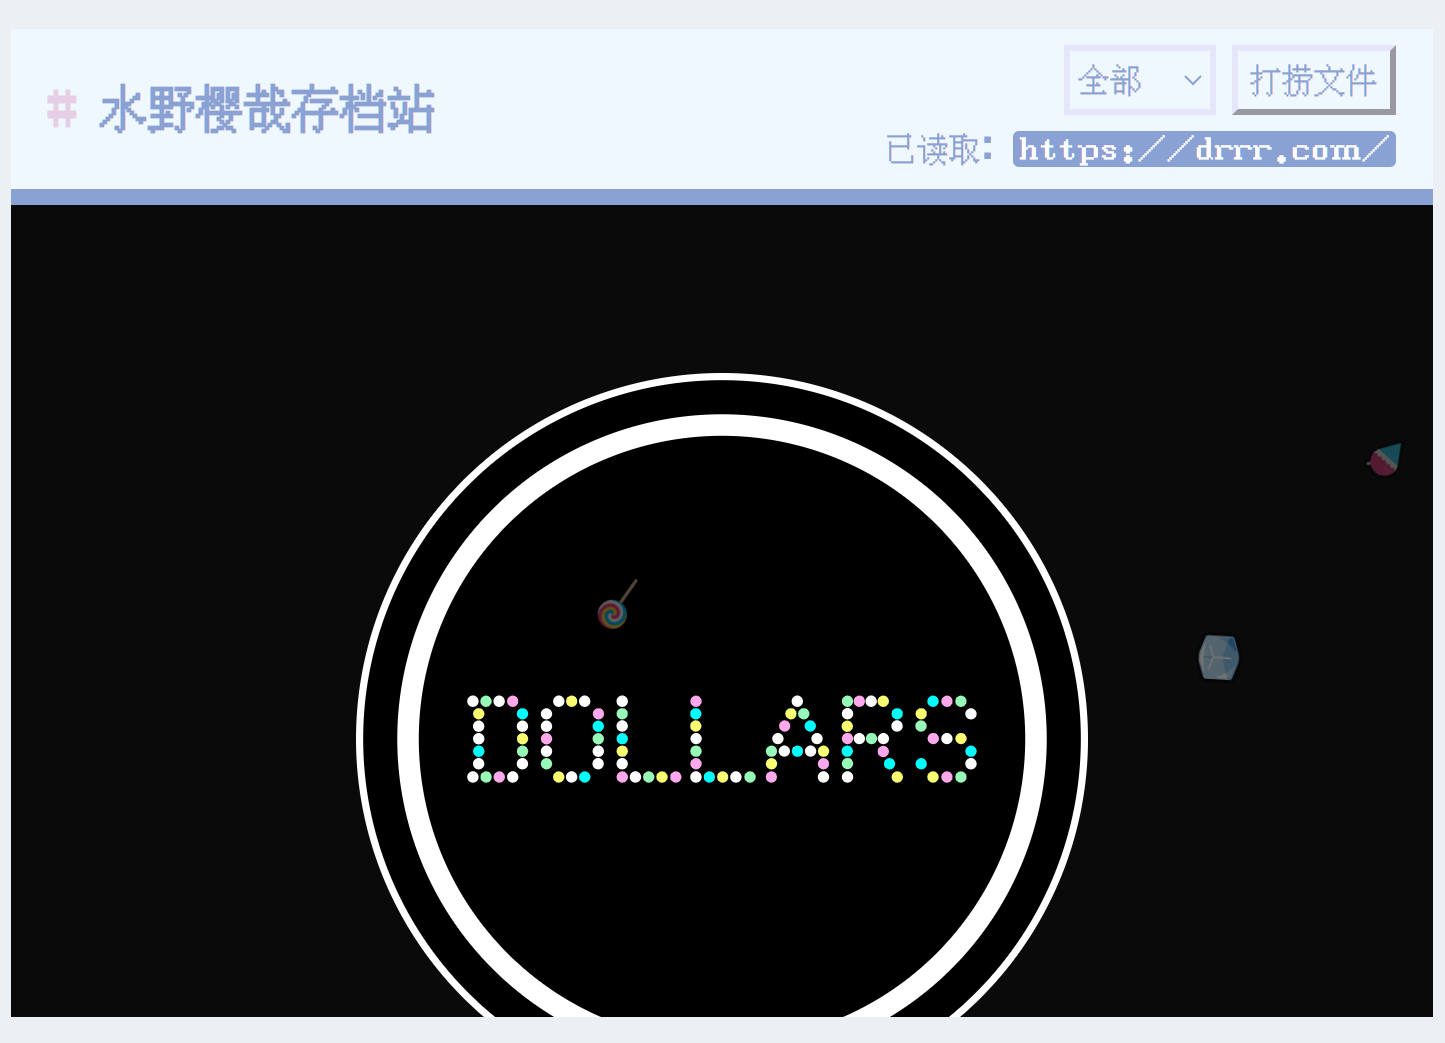
在Mengru老师的博客里发掘到了冲浪时间小玩具,又美观又实用,心想能不能拷贝到自己的博客上,遂下载了老师公开的项目仓库里的内容,解压研究了一会儿,发现简直和一键安装整合包一样友好(落泪
安装方法很简单,将项目里的html文件丢入/layouts/patrials,并根据自己的需要进行修改。
<!DOCTYPE html>
<html lang="zh-cmn-Hans">
<head>
  <meta charset="UTF-8">
  <meta http-equiv="X-UA-Compatible" content="IE=edge">
  <meta name="viewport" content="width=device-width, initial-scale=1.0">
  <link href="/css/index.css" rel="stylesheet">
</head>
<body>
<header id="top-header">
  <div class="header-content">
    <h1>水野樱哉存档站</h1>
    <div>
      <div class="surf-filter" id="surf-filter">
        <select id="type-select">
          <option value="all">全部</option>
        </select>
        <button id="btn-start">打捞文件</button>
      </div>
      <div class="current-info">
        <div>已读取:<a target="_blank" id="url-display">空文件模板</a></div>
      </div>
    </div>
  </div>
</header>
<div class="view-container">
  <iframe id="viewer"></iframe>
</div>
<script src="/js/window.js"></script>
<script>
fetch('/json/index.json')
  .then(res => res.json())
  .then(data => {
    Surf.init(data)
  })
</script>
</body>
</html>
把调好颜色样式的css文件放进/static/css。
html {
  height: 100%;
  overflow: hidden;
}
body {
  height: 100%;
  margin: 0;
  display: flex;
  flex-direction: column;
  font-family: "ipx","ipx en";
}
#top-header {
  width: 100%;
  background-color: #f0f8ff;
  border-bottom: .5em solid #8aa2d3;
  min-height: 9%;
}
.header-content {
  height: 100%;
  margin: 0 auto;
  width: 100%;
  max-width: 700px;
  display: flex;
  flex-wrap: wrap;
  align-items: center;
  justify-content: space-between;
  padding: .5em .8em;
  box-sizing: border-box;
}
#top-header h1 {
  font-size: 1.5em;
  margin: 0;
  color: #8aa2d3;
}
#top-header h1::before {
  content: "# ";
  color: #e6cfe6;
}
.surf-filter {
  text-align: right;
}
.surf-filter select {
  height: 2.2em;
  border-color: #e6e6fa;
  background-color: #f0f8ff;
  border-width: 3px;
  color: #8aa2d3;
}
.surf-filter button {
  height: 2.2em;
  border-color: #e6e6fa;
  background-color: #f0f8ff;
  border-width: 3px;
  color: #8aa2d3;
}
.current-info {
  padding-top: 5px;
  color: #8aa2d3;;
}
.current-info a {
  color: #fff;
  padding: 1px 3px;
  border-radius: 3px;
  background-color: #8aa2d3;;
}
.view-container {
  height: 91%;
}
.view-container iframe {
  height: 100%;
  width: 100%;
  border: 0;
}

body[data-theme='dark'] #top-header {
  background-color: #282c34;
}
body[data-theme='dark'] .surf-filter select {
  border-color: #e6e6fa;
  background-color: #282c34;
}
body[data-theme='dark'] .surf-filter button {
  border-color: #e6e6fa;
  background-color: #282c34;
}

@media (max-width: 500px) {
  #top-header h1 {
    display: none;
  }
  .header-content {
    justify-content: flex-end;
  }
  body {
    height:100vh; /* 将页面高度设置为视口高度的100% */
    overflow-y: auto; /* 允许纵向滚动 */
  }
}
引入的js文件原封不动复制到/static/js
;(function () {
let Data = {}
let Rest = []
let CurType = 'all'

function init (data) {
  Data = data
  update('all')
  Object.keys(Data).forEach(t => {
    const e = document.createElement('option')
    e.value = t
    e.innerText = Data[t].name
    $typeSelect.append(e)
  })
}

const $iframe = document.getElementById('viewer')
const $btnStart = document.getElementById('btn-start')
const $urlDisplay = document.getElementById('url-display')
const $typeSelect = document.getElementById('type-select')

$typeSelect.onchange = function (e) {
  update(e.target.value)
}

$btnStart.onclick = function () {
  const url = fetchOne()
  $iframe.src = url
  $urlDisplay.innerText = url
  $urlDisplay.href = url
}

function update (type) {
  CurType = type
  Rest = type === 'all'
    ? Object.keys(Data).reduce((p, n) => p.concat(Data[n].items), [])
    : Data[type].items.slice()
}

function fetchOne () {
  if (!Rest.length) {
    update(CurType)
  }
  const i = rand(Rest.length)
  return Rest.splice(i, 1)
}

function rand (n) {
  return Math.floor(Math.random() * n)
}

window.Surf = {
  init
}

})()
最后的部分是读取网址和分类的json数据文件,按照示例写入后在/static新建一个文件夹黏贴进去就好了!注意,如果你改动了文件名称,相应html代码里引入的文件名也要修改。之后如法炮制在博客里新建一个独立页面,渲染这个html代码,一个属于自己的存档站就完成了!
潘多拉密码箱子
已删除
存档纪念照
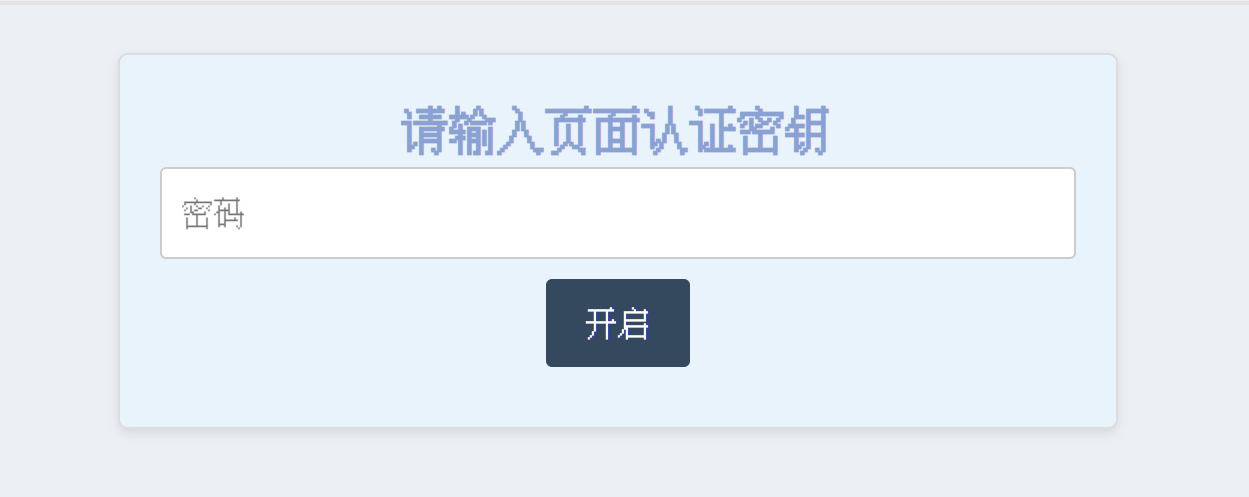
为了把之前研究出来的文章密码模板发扬光大而制作出的换皮小玩具,是一个上锁的小箱子,输入设置好的不同密码可以前往不同的页面。下面是这个箱子的html代码:
<style>

  /* 弹窗样式 */

  @media screen and (max-width: 600px) {
    .custom-popup {
      width: 300px!important;
  }
}
  .custom-popup {
      width: 500px;
      padding: 20px;
      background-color: #e9f3fb;
      border: 1px solid #ddd;
      border-radius: 5px;
      box-shadow: 0px 2px 5px rgba(0, 0, 0, 0.1);
      text-align: center;
      font-family: ipx;
      color: #8aa2d3;
      margin: 0 auto;
  }

  .custom-popup input[type="password"] {
      width: 100%;
      padding: 10px;
      margin-bottom: 10px;
      border: 1px solid #ccc;
      border-radius: 3px;
  }

  .custom-popup button {
      background-color: #34495e;
      color: #fff;
      border: none;
      border-radius: 3px;
      padding: 10px 20px;
      cursor: pointer;
      transition: background-color 0.3s ease;
  }

  .custom-popup button:hover {
  background-color: #465b70; /* 鼠标悬停时的背景颜色 */
}

  /* 密码错误提示样式 */
  .error-message {
      color: red;
      font-size: 14px;
      margin-top: 10px;
  }

  body[data-theme='dark'] .overlay {
      background-color: #2f3136; /* 黑夜模式下的背景颜色 */
  }

  body[data-theme='dark'] .custom-popup {
      background-color: #1e1e1e; /* 黑夜模式下的背景颜色 */
      color: #8aa2d3; /* 黑夜模式下的文字颜色 */
  }

  body[data-theme='dark'] .custom-popup button {
      background-color: #2c3e50; /* 黑夜模式下的按钮背景颜色 */
  }

  body[data-theme='dark'] .custom-popup button:hover {
      background-color: #34495e; /* 黑夜模式下按钮悬停时的背景颜色 */
  }
</style>

  <div class="custom-popup">
      <h2>请输入页面认证密钥</h2>
      <input type="password" id="password" placeholder="密码">
      <button id="submit-button">开启</button>
      <div class="error-message" id="error-message"></div> <!-- 密码错误提示 -->
  </div>


<script>
var passwordInput = document.getElementById('password');
var submitButton = document.getElementById('submit-button');
var errorMessage = document.getElementById('error-message');

passwordInput.addEventListener('keyup', function(event) {
    if (event.key === 'Enter') {
        submitButton.click(); // 模拟点击提交按钮
    }
});

submitButton.addEventListener('click', function() {
    var inputPassword = passwordInput.value;

    if (inputPassword === '') {
        window.location.href = '';
    } else if (inputPassword === '') {
        window.location.href = '';
    } else {
        errorMessage.textContent = '认证失败!'; // 显示错误提示
    }
});
</script>
简单的图片并列排版
来源Hugo多图排版这样来,非常方便好用,解决了我展示我拍的竖版可爱母肥时的图片排版问题。实现步骤特别简单,只需把这一段代码丢进css。
.post-content p:has(> img:nth-child(2)){column-count:2;column-gap:8px;margin:6px 0;}
.post-content p:has(> img:nth-child(3)){column-count:3;}
.post-content p:has(> img:nth-child(4)){column-count:4;}
.post-content p:has(> img:nth-child(5)){column-count:5;}
.post-content p:has(> img:nth-child(6)){column-count:4;}
.post-content p:has(> img:nth-child(2)) img{display:inherit;}
.post-content p:has(> img:nth-child(6)) img{margin-bottom:8px;}
这样你在编辑md文件时只需把需要并列显示的图片换行但不空行地放在一起即可,就像制造一个个代码块聚落,大人请吃母肥!


短代码
本次装修粉刷的短代码绝大部分参考了Hugo | 在 Stack 主题上可行的短代码们,挑了一些美丽,实用且可行的小物件。
文本黑幕
把设置丢入css。
.shady {
    color:#000;
    font-weight: normal;
    box-shadow: 0px -20px 0px rgba(0,0,0,1) inset;
}
.shady:hover{
   font-weight: normal;
    color:#FFF;
    box-shadow: 0px -20px 0px rgba(0,0,0,1) inset;
}
使用方法如下:
<span class="shady">呜哇,被发现了!</span>
呜哇,被发现了!
仿github样式
2025.07.29,样式修改,去除链接跳转
在layouts/shortcodes里新建github.html,复制以下内容。我将logo改成了读取fontawesome的形式。
<div class="github">
    <div class="logo">
        <img src="{{ .Get "icon" }}" style="height: 23px; position: relative; top: -5.5px;">
        <p class="name">{{ .Get "name" }}</p>
    </div>
    <div class="description">{{ .Get "description" }}</div>
    <div class="language">
        <span class="language-color" style="background-color: {{ .Get "color" }}"></span>
        <span class="language-name">{{ .Get "language" }}</span>
    </div>
</div>
修改后的css如下
.github {
    border: 1px solid var(--color-text-primary);
    border-radius: 3px;
    margin: 0 auto;
    margin-bottom: 1em;
    padding: 1em;
    background-color: var(--color-codebg);
    .logo {
        display: flex; /* 让图标和名字在同一行 */
        align-items: center; /* 垂直居中对齐 */
    }
    .name {
      font-weight: bold;
      color: var(--color-primary);
      margin-left: 0.2em;
      position: relative;
    }
    .description {
      margin-top: 0.2em;
      margin-bottom: 0.5em;
      color: var(--color-font);
      text-align: justify;
      font-size: 90%;
    }
    .language-color {
      position: relative;
      top: 1px;
      display: inline-block;
      width: 0.75em;
      height: 0.75em;
      border-radius: 50%;
    }
    .language-name {
      color: var(-color-text-primary);
      font-size: 90%;
      margin-left: 0.5em;
    }
}
使用方法。
{< github icon="" name="" description="" color="" language="">}

天堂错误文件
旧样式代码存档
在layouts/shortcodes里新建github.html,复制以下内容。我将logo改成了读取fontawesome的形式。
<div class="github">
    <div class="logo">
        <i class="{{ .Get "icon_class" }}"></i>
        <a class="name" href="{{ .Get "link" }}" target="_blank">{{ .Get "name" }}</a>
    </div>
    <div class="description">{{ .Get "description" }}</div>
    <div class="language">
        <span class="language-color" style="background-color: {{ .Get "color" }}"></span>
        <span class="language-name">{{ .Get "language" }}</span>
    </div>
</div>
然后在自定义css丢入设置。
.github {
    border: 1px solid var(--color-text-primary);
    border-radius: 3px;
    margin: 0 auto;
    margin-bottom: 1em;
    padding: 1em;
    background-color: #f0f8ff;

    .name {
      font-weight: bold;
      color: #8f82bc;
      text-decoration: underline;
      margin-left: 0.5em;
      position: relative;
    }
    .description {
      margin-top: 0.5em;
      margin-bottom: 0.5em;
      color: var(-color-text-primary);
      text-align: justify;
      font-size: 90%;
    }
    .language-color {
      position: relative;
      top: 1px;
      display: inline-block;
      width: 0.75em;
      height: 0.75em;
      border-radius: 50%;
    }
    .language-name {
      color: var(-color-text-primary);
      font-size: 90%;
      margin-left: 0.5em;
    }
}
body[data-theme='dark'] .github{
    background-color: #1e1e1e;
}
使用方法。
{< github icon_class="" name="" link="" description="" color="" language="">}
天堂错误文件
卡片样式
2025.11.22二编:添加手账方格样式背景。
新建card.html。
{{- $raw := (markdownify .Inner | chomp) -}} {{- $block := findRE
  "(?is)^<(?:address|article|aside|blockquote|canvas|dd|div|dl|dt|fieldset|figcaption|figure|footer|form|h(?:1|2|3|4|5|6)|header|hgroup|hr|li|main|nav|noscript|ol|output|p|pre|section|table|tfoot|ul|video)\\b"
  $raw 1 -}}
  <div class="mycard">
    <div class="content">{{- if or $block (not $raw) }}{{ $raw }}{{ else }} {{ $raw }} {{ end -}}</div>
  </div>
惯例在css里定义样式。
.mycard {
  padding: 10px 20px;
  margin: 20px 0;
  border-radius: 4px;
  word-break: break-all;
  background:
    /* 横线 */
    linear-gradient(#8aa2d330 1px, transparent 1px) 0 0 / 20px 20px,
    /* 竖线 */
    linear-gradient(90deg, #8aa2d330 1px, transparent 1px) 0 0 / 20px 20px,
    /* 原背景 */
    #d2e5eb14;
  box-shadow: 0 6px 10px 0 #00000033;
    .content {
      line-height: 30px;
      padding-top: 10px;
    }
}
使用方法如下,卡片里换行需要加<br>。
{< card >}
天堂
<br>
错误
<br>
文件
{< /card >}
错误
文件
时间轴
参考了这篇文章的时间轴代码,修改了style区块下的样式,并删除了标题的链接。
{{- $date := .Get "date" -}} {{- $title := .Get "title" -}} {{- $description := .Get "description" -}} {{- $tags := .Get "tags" -}}

<div class="timeline__row">
    <div class="timeline__time">
        <div class="timeline__time">{{ $date }}</div>
        <div class="timeline__split-line"></div>
    </div>
    <div class="timeline__content">
        <div class="timeline__tags">
            {{- with split $tags ", " -}} {{- range . }}{{- if eq . "样式" }}
            <span class="timeline__tag timeline__tag-style">{{ . }}</span> {{- else if eq . "文章" }}
            <span class="timeline__tag timeline__tag-article">{{ . }}</span> {{- else if eq . "页面" }}
            <span class="timeline__tag timeline__tag-page">{{ . }}</span> {{- else }}
            <span class="timeline__tag">{{ . }}</span> {{- end }} {{- end }} {{- end }}
        </div>
            <div class="timeline__title">{{ $title }}</div>
        <div class="timeline__description">
            {{ $description }}
        </div>
    </div>
</div>


<style>
    .timeline {
        display: flex;
        flex-direction: column;
    }

    .timeline__row {
        display: flex;
        padding-left: 4%;
        height: 90px;
    }

    .timeline__time {
        flex: 0 0 110px;
        color: var(--color-text-primary);
        font-size: 17px;
        text-transform: uppercase;
        position: relative;
        display: flex;
        flex-direction: column;
        align-items: center;
        padding: 0.5rem 0;
    }

    .timeline__time-text {
        margin: 0;
    }

    .timeline__split-line {
        position: absolute;
        top: 0.5rem;
        right: -20px;
        height: 100%;
        width: 2px;
        background-color: #8aa2d3;
        z-index: 0;
    }

    .timeline__split-line:before {
        content: "";
        position: absolute;
        top: 24%;
        right: -4px;
        transform: translateY(-50%);
        width: 10px;
        height: 10px;
        background-color: #8aa2d3;
        box-shadow: 0 0 0 4px var(--theme);
        border-radius: 50%;
        border: 0px solid #84c4e2;
        z-index: -1;
    }

    .timeline__content {
        flex: 1;
        margin-left: 4.5rem;
        padding: 0.5rem 0 1.2rem 0;
    }

    .timeline__title {
        margin: 0;
        margin-bottom: 2px;
        padding-top: 3px;
        margin-left: 0.5rem;
        color: var(--color-text-primary);
        font-family: var(--font-family-teshu);
        font-size: 19px;
        font-weight: 600;
        width: fit-content;
        display: inline-block;
        vertical-align: middle;
        /* 垂直居中对齐 */
    }

    .timeline__tags {
        display: inline-block;
        padding: 0;
        margin-left: 0.3rem;
        align-items: center;
        gap: 0.3rem;
    }

    .timeline__tag {
        display: inline-block;
        color: var(--secondary);
        background-color: #84c4e230;
        border: 1.5px solid #84c4e230;
        border-radius: 999px;
        padding: 0rem 0.5rem;
        font-size: 12px;
        white-space: nowrap;
        line-height: 1.4rem;
        opacity: 0.8;
        vertical-align: middle;
        /* 垂直居中对齐 */
    }

    .timeline__description {
        font-size: 15px;
        line-height: 1.6;
        color: var(--color-text-primary);
        overflow: hidden;
        text-overflow: ellipsis;
        margin: 0.5rem 0 0.4rem 1.5rem;
        /* 添加 1.5rem 的左侧内边距 */
    }
    /* 为类名为 "timeline__tag-style" 的标签定义颜色 */

    .timeline__tag-style {
        background-color: #c581da;
        /* 替换为你希望的颜色 */
        border-color: #c581da;
        /* 与背景色相同或不同,根据需要自定义 */
        color: #FFFFFF;
        /* 根据需要选择文本颜色 */
    }
    /* 为类名为 "timeline__tag-article" 的标签定义颜色 */

    .timeline__tag-article {
        background-color: #92d392;
        /* 替换为你希望的颜色 */
        border-color: #92d392;
        /* 与背景色相同或不同,根据需要自定义 */
        color: #000000;
        /* 根据需要选择文本颜色 */
    }
    /* 为类名为 "timeline__tag-page" 的标签定义颜色 */

    .timeline__tag-page {
        background-color: #707070;
        /* 替换为你希望的颜色 */
        border-color: #707070;
        /* 与背景色相同或不同,根据需要自定义 */
        color: #FFFFFF;
        /* 根据需要选择文本颜色 */
    }

    @media screen and (max-width: 768px) {
    .timeline__time {
        font-size: 14px; /* 在小屏幕上使用较小的字体大小 */
    }

    .timeline__title {
        font-size: 16px; /* 在小屏幕上使用较小的字体大小 */
        margin-top: 5px; /* 调整上边距以实现标题与时间的对齐 */
    }

    .timeline__description {
        display: none;
    }

    .timeline__tags {
        display: none;
    }
}
</style>
短代码如下:
{< timeline date="" title="" description="" tags="" >}